Today I am going to illustrate how to install Dynamics AX 2012 R3 from scratch.
Please make sure that the AX prerequisites are installed already before starting installation of AX. Now I will illustrate the step by step AX installation.
STEP-1 INSTALLING AX DATABASES
(a) Open the Dynamics AX setup and double click on Autorun.

(b) The AX installation setup screen will open.

(c) Now click on Install Microsoft dynamics AX components.

(d) Now click next to go to the installation type selection page.

(e) On Review License Terms Page select I accept the license terms and click on next to continue the installation.


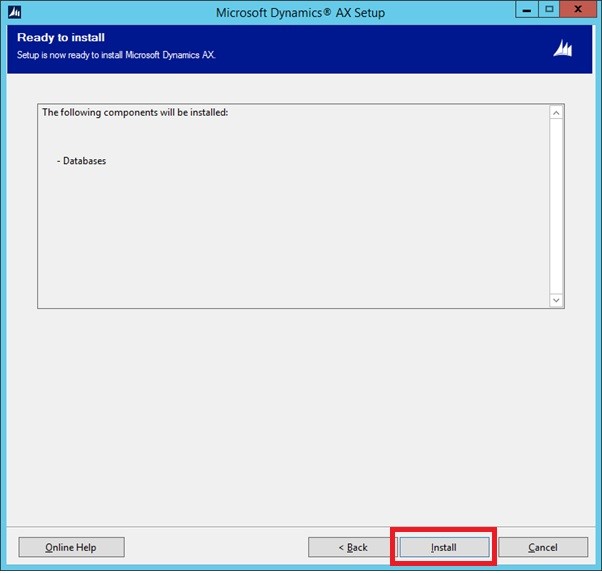
(g) On the Ready to install page, click Install.

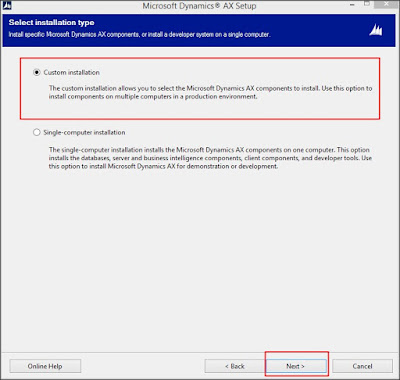
(i) Now you have to select the type of installation you want to do. select one of them and click on next.
(j) Now you have to select the component which you want to install. So I select Databases and click on next.


(l) On the Select databases page, select whether you want to create new databases by using Setup, or whether you want to configure existing databases. If you are upgrading, you should select to configure existing databases. Select one of them and click on next.

(m) If you want to create a new databases on the Create new databases page, in the Server name select the name of the computer that runs SQL Server. In the Database name field enter MicrosoftDynamicsAX and in Baseline Database name field enter MicrosoftDynamicsAXBaseline and click on next.

(n) On the Select additional models page, select models from the Available Models. The AX Setup lists all the models that are contained in the Models folder and its subfolders. The Required models are selected by default,
Click Next to continue the installation.

(o) On the Prerequisite validation Page, resolve any errors. When no errors remain, click next.
(q) After the installation is completed, click Finish to close the wizard.

STEP-2 INSTALLING AOS (Application Object Server)

Baseline Database
name and click on next.


STEP-2 INSTALLING AX CLIENT


Please make sure that the AX prerequisites are installed already before starting installation of AX. Now I will illustrate the step by step AX installation.
STEP-1 INSTALLING AX DATABASES
(a) Open the Dynamics AX setup and double click on Autorun.

(b) The AX installation setup screen will open.

(c) Now click on Install Microsoft dynamics AX components.

(d) Now click next to go to the installation type selection page.

(e) On Review License Terms Page select I accept the license terms and click on next to continue the installation.

(f) On Select a file location Page Browse file location
for Microsoft Dynamics AX and click on next.

(g) On the Ready to install page, click Install.
(h) On Select an
installation option page, select Microsoft
Dynamics AX and click on next.

(i) Now you have to select the type of installation you want to do. select one of them and click on next.

(j) Now you have to select the component which you want to install. So I select Databases and click on next.

(k) On the Prerequisite
validation Page, resolve any errors. When no errors
remain, click Next.

(l) On the Select databases page, select whether you want to create new databases by using Setup, or whether you want to configure existing databases. If you are upgrading, you should select to configure existing databases. Select one of them and click on next.

(m) If you want to create a new databases on the Create new databases page, in the Server name select the name of the computer that runs SQL Server. In the Database name field enter MicrosoftDynamicsAX and in Baseline Database name field enter MicrosoftDynamicsAXBaseline and click on next.

(n) On the Select additional models page, select models from the Available Models. The AX Setup lists all the models that are contained in the Models folder and its subfolders. The Required models are selected by default,
Click Next to continue the installation.

(o) On the Prerequisite validation Page, resolve any errors. When no errors remain, click next.
(p) On the Ready
to install page, click Install.

(q) After the installation is completed, click Finish to close the wizard.

STEP-2 INSTALLING AOS (Application Object Server)
(a) Open the Dynamics AX setup and double click on Auto run.
(b) The AX installation setup screen will open.
(c) Now click on Install Microsoft dynamics AX components.
(d) Now click next.
(e) On the next screen click Add or
modify components.
(f) Now you have to select the component which you want to
install. So I select AOS
and click on
next.

(g) On
the Prerequisite
validation
Page, resolve any errors. When no errors remain, click
next.
(h) On
the Connect
to the databases page, enter Server name, Database name and

(i) On the Configure an AOS instance
page, enter Instance name, TCP/IP Port,
Services
WSDL Port and Services Endpoint Port and click on next.

(j) On
the next page you have to specify an AOS account
and click on next to continue the
installation process.

(k) On
the Prerequisite
validation
Page, resolve any errors. When no errors remain, click next.
(l) On
the Ready
to install
page, click Install.

(m) After
the installation is completed, click Finish to
close the wizard.

(a) Open the Dynamics AX setup and double click on Auto run.
(b) The AX installation setup screen will open.
(c) Now click on Install Microsoft dynamics AX components.
(d) Now click next.
(e) On the next screen click Add or modify components.
(f) Now you have to select the component which you want to install. So I select AOS
and click on next.

(g) On the Prerequisite validation Page, resolve any errors.
When no errors remain, click next.
(h) On Select client preferences
page, select Language and installation type and click on next.

(i) On Specify a location for
configuration settings page, the selection is done by default
.you
have to click on next to continue the installation process.

(j) On connect to an AOS instance
page, you have to click on next to continue the installation
process.

(k) On
the Prerequisite
validation
Page, resolve any errors. When no errors remain, click Next.
(l) On
the Ready
to install
page, click Install.

(m) After
the installation is completed, click Finish to close the wizard.

Our Retail POS solutions are designed to address the challenges of Small & Independent Aspirants, Retailers and large multi-store Retail Chains. Their sector specific orientation, built using latest technologies, assure retailers 'a visible improvement' in customer engagement, by helping them source the right product at right price at the right time.
ReplyDeleteKadang Pintar: Online Casino, Live Dealer Gaming - Kadangpintar
ReplyDeleteKadang Pintar is an online casino and live dealer gaming provider from 온카지노 Kadangpintar. Join หารายได้เสริม and 바카라 사이트 get the best odds and offers and keep winning!
This is a very helpful guide for installing Microsoft Dynamics ERP! The step-by-step breakdown makes the process much easier to follow, especially for those handling ERP installations for the first time. Thanks for sharing this valuable resource—it’s a great reference for anyone looking to implement Microsoft Dynamics ERP successfully!
ReplyDelete